Hexo+theme-next+github page搭建blog

本文主要介绍win10下利用Hexo+theme-next+github page搭建个人博客。其中,theme-next是一款简洁而又功能强大的Hexo主题。

1 环境配置

1.1 安装Hexo

安装Hexo前需要安装Node.jsGit。安装好后,在cmd命令行下敲入命令npm install -g hexo-cli即可完成安装。这里有详细的官网安装教程。

1.2 下载/配置主题theme-next

这里有详细的官方配置教程。

要应用主题,需在博客配置文件(即根目录下的_config.yml)里修改配置:

1
2
3
4
# Extensions
## Plugins: https://hexo.io/plugins/
## Themes: https://hexo.io/themes/
theme: next

1.3 将个人博客与github仓库关联

(1)在自己的github账户上创建一个github仓库,命名为username.github.io
(2)在博客配置文件(即根目录下的_config.yml)里修改配置:

1
2
3
4
5
6
# Deployment
## Docs: https://hexo.io/docs/one-command-deployment
deploy:
type: git
repo: https://github.com/username/username.github.io.git
branch: master

2 博客搭建&美化

2.1 创建菜单栏

打开cmd窗口,执行以下命令创建文件夹(根据需求选择创建哪些文件夹):

1
2
3
hexo new page home
hexo new page categories
......

检查主题配置文件(即根目录下的_config.next.yml),如果子菜单被注释掉了(如archives/schedule),则取消注释(注:如果想调整子菜单顺序直接在_config.next.yml配置文件里调整即可)。

1
2
3
4
5
6
7
8
9
10
11
12
13
# Usage: `Key: /link/ || icon`
# Key is the name of menu item. If the translation for this item is available, the translated text will be loaded, otherwise the Key name will be used. Key is case-senstive.
# Value before `||` delimiter is the target link, value after `||` delimiter is the name of Font Awesome icon.
# External url should start with http:// or https://
menu:
home: / || fa fa-home
categories: /categories/ || fa fa-th
tags: /tags/ || fa fa-tags
about: /about/ || fa fa-user
# archives: /archives/ || fa fa-archive
# schedule: /schedule/ || fa fa-calendar
# sitemap: /sitemap.xml || fa fa-sitemap
# commonweal: /404/ || fa fa-heartbeat

将要添加的头像图片和Logo放在指定的文件夹中,此例中放在/node_modules/hexo-theme-next/source/images/目录下。

2.2.1 设置头像

(1)在_config.next.yml下填入头像的url,但这样头像是正方形的且没有动态效果:

1
2
3
4
5
6
7
8
# Sidebar Avatar
avatar:
# Replace the default image and set the url here.
url: /images/cattle.jpg
# If true, the avatar will be dispalyed in circle.
rounded: false
# If true, the avatar will be rotated with the cursor.
rotated: false

(2)设置圆形头像且与鼠标接触头像能够旋转
找到sidebar-author.styl配置文件,将.site-author-image替换为以下内容:

1
2
3
4
5
6
7
8
9
10
11
12
13
14
15
16
17
18
19
20
21
22
23
24
25
26
27
28
29
30
31
32
33
34
35
36
37
38
39
40
41
42
43
44
45
46
47
48
49
50
51
52
53
54
55
56
57
58
59
60
61
62
63
64
65
66
67
68
69
70
.site-author-image {
display: block;
margin: 0 auto;
padding: $site-author-image-padding;
max-width: $site-author-image-width;
height: $site-author-image-height;
border: $site-author-image-border-width solid $site-author-image-border-color;

/* 头像圆形 */
border-radius: 80px;
-webkit-border-radius: 80px;
-moz-border-radius: 80px;
box-shadow: inset 0 -1px 0 #333sf;


/* 鼠标经过头像旋转360度 */
-webkit-transition: -webkit-transform 1.0s ease-out;
-moz-transition: -moz-transform 1.0s ease-out;
transition: transform 1.0s ease-out;
}

img:hover {
/* 鼠标经过停止头像旋转
-webkit-animation-play-state:paused;
animation-play-state:paused; */

/* 鼠标经过头像旋转360度 */
-webkit-transform: rotateZ(360deg);
-moz-transform: rotateZ(360deg);
transform: rotateZ(360deg);
}

/* Z轴旋转动画 */
@-webkit-keyframes play {
0% {
-webkit-transform: rotateZ(0deg);
}
100% {
-webkit-transform: rotateZ(-360deg);
}
}
@-moz-keyframes play {
0% {
-moz-transform: rotateZ(0deg);
}
100% {
-moz-transform: rotateZ(-360deg);
}
}
@keyframes play {
0% {
transform: rotateZ(0deg);
}
100% {
transform: rotateZ(-360deg);
}
}

.site-author-name {
color: $site-author-name-color;
font-weight: $site-author-name-weight;
margin: $site-author-name-margin;
}

.site-description {
color: $site-description-color;
font-size: $site-description-font-size;
margin-top: $site-description-margin-top;
}

_config.next.yml文件夹下替换掉Logo图片(可在这里将图片转成16×16/32×32大小)的路径即可,如下所示:

1
2
3
4
5
6
7
# ---------------------------------------------------------------
# Site Information Settings
# ---------------------------------------------------------------

favicon:
small: /images/circle-cattle-16×16.png
medium: /images/circle-cattle-32×32.png

2.3 子菜单设置

2.3.1 首页

(1)首页可以自定义(即可以在/home/目录下创建index.md文件,在里面自定义要显示的内容)。默认情况(/home/目录下没有index.md)下点击首页会显示所有博客(默认全文显示)。
(2)首页显示博客摘要

方法1:
直接在文章中需要截断的地方加入:

<!--more-->

那么在首页显示时就会显示<!--more-->前面的内容。

方法2:
在文章中的front-matter中添加description字段,自定义摘要,例子如下:

1
2
3
4
5
title: BGP与邻居建立连接-基于RFC4271
date: 2021-04-04 12:48:42
categories: BGP
tags: BGP
description: 我是摘要.

2.3.2 分类

(1)将categories文件夹下的index.md文件的meta信息中的type设置为categories类型,例子如下:

1
2
3
4
5
---
title: 分类
date: 2021-04-03 21:26:04
type: "categories"
---

(2)将要写的博客归类到某一类,比如将BGP与邻居建立连接-基于RFC4271归类到BGP这一类,即在meta信息中填写categories: BGP,那么该文章就会自动被归类为BGP这一类。

1
2
3
4
5
6
---
title: BGP与邻居建立连接-基于RFC4271
date: 2021-04-04 12:48:42
categories: BGP
tags: BGP
---

当点击分类时,页面显示如下:
分类

2.3.3 标签

设置类似于分类

2.3.4 添加博客搜索功能

(1)安装插件hexo-generator-searchdb

npm install hexo-generator-searchdb --save

(2)修改主题配置文件,将local_search改为enable

1
2
3
4
# Local Search
# Dependencies: https://github.com/next-theme/hexo-generator-searchdb
local_search:
enable: true

(3)完成后在菜单栏处会多一个搜索

2.4 访问量统计

2.4.1 网站总访问量统计

thmem-next主题集成了不蒜子统计,在配置文件(_config_next.yml)里enable一下即可,不蒜子也可以统计单个博文访问量,不过据说不太好用,下面用Leancloud统计单个博客访问量:

1
2
3
4
5
6
7
8
9
10
# Show Views / Visitors of the website / page with busuanzi.
# For more information: http://ibruce.info/2015/04/04/busuanzi/
busuanzi_count:
enable: enable
total_visitors: true
total_visitors_icon: fa fa-user
total_views: true
total_views_icon: fa fa-eye
post_views: false
post_views_icon: far fa-eye

2.4.2 单个博客访问量统计

theme-next也已集成了Leancloud访问量统计功能,只需在_config.next.yml配置文件里enable一下即可:

1
2
3
4
5
6
7
8
9
10
11
12
13
# Show number of visitors of each article.
# You can visit https://www.leancloud.cn to get AppID and AppKey.
leancloud_visitors:
enable: true
app_id: **********************
app_key: **********************
# Required for apps from CN region
server_url: # <your server url>
# Dependencies: https://github.com/theme-next/hexo-leancloud-counter-security
# If you don't care about security in leancloud counter and just want to use it directly
# (without hexo-leancloud-counter-security plugin), set `security` to `false`.
security: true
visitor: true

上述配置中需要app_idapp_key,可以到Leancloud上注册账号并注册应用获取。

2.4.3 文章加密访问

(1)安装插件npm install hexo-blog-encrypt
(2)在hexo根目录下的配置文件_config.yml下添加一下内容,更多详情请看这里

1
2
3
4
5
6
7
8
# Security
encrypt:
enable: true
abstract: 有东西被加密了, 请输入密码查看.
message: 您好, 这里需要密码.
theme: shrink
wrong_pass_message: 抱歉, 这个密码看着不太对, 请再试试.
wrong_hash_message: 抱歉, 这个文章不能被校验, 不过您还是能看看解密后的内容.

(3)在需要加密的文章里添加password字段,例子如下:

1
2
3
4
5
6
7
title: Blog encrypt test
date: 2021-04-10 13:21:00
categories: Blog encrypt test
tags: Blog encrypt test
password: **********
abstract: Welcome to my blog, enter password to read.
message: Welcome to my blog, enter password to read.

2.4.4 取消theme-next主题目录自动编号

theme-next主题中,在左侧栏文章目录中会为标题自动编号,如果在文章中也想显示目录的序号,那么在文章目录中的标题编号就会重复,如下图所示:

theme-next目录自动编号

如果希望在文章中显示标题编号,同时想让文章目录也好看一点,那就取消theme-next的目录自动编号,即修改主题配置文件_config.next.ymlnumber属性为false

1
2
3
4
5
6
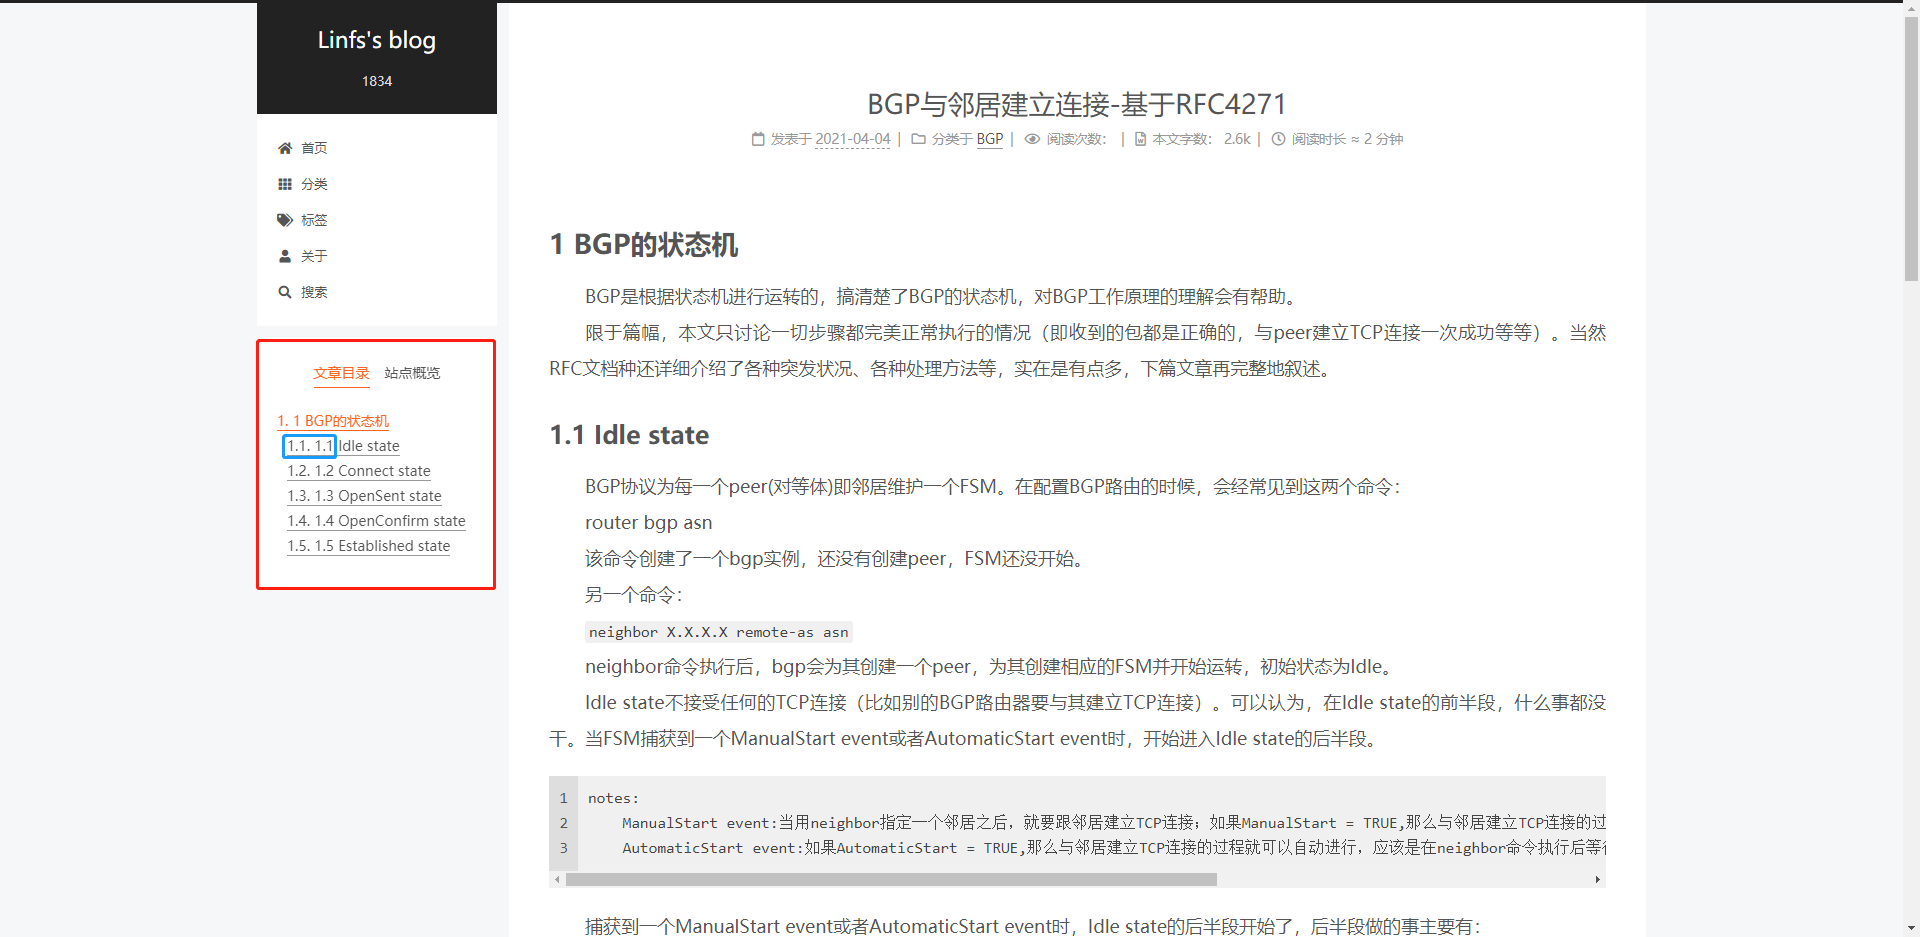
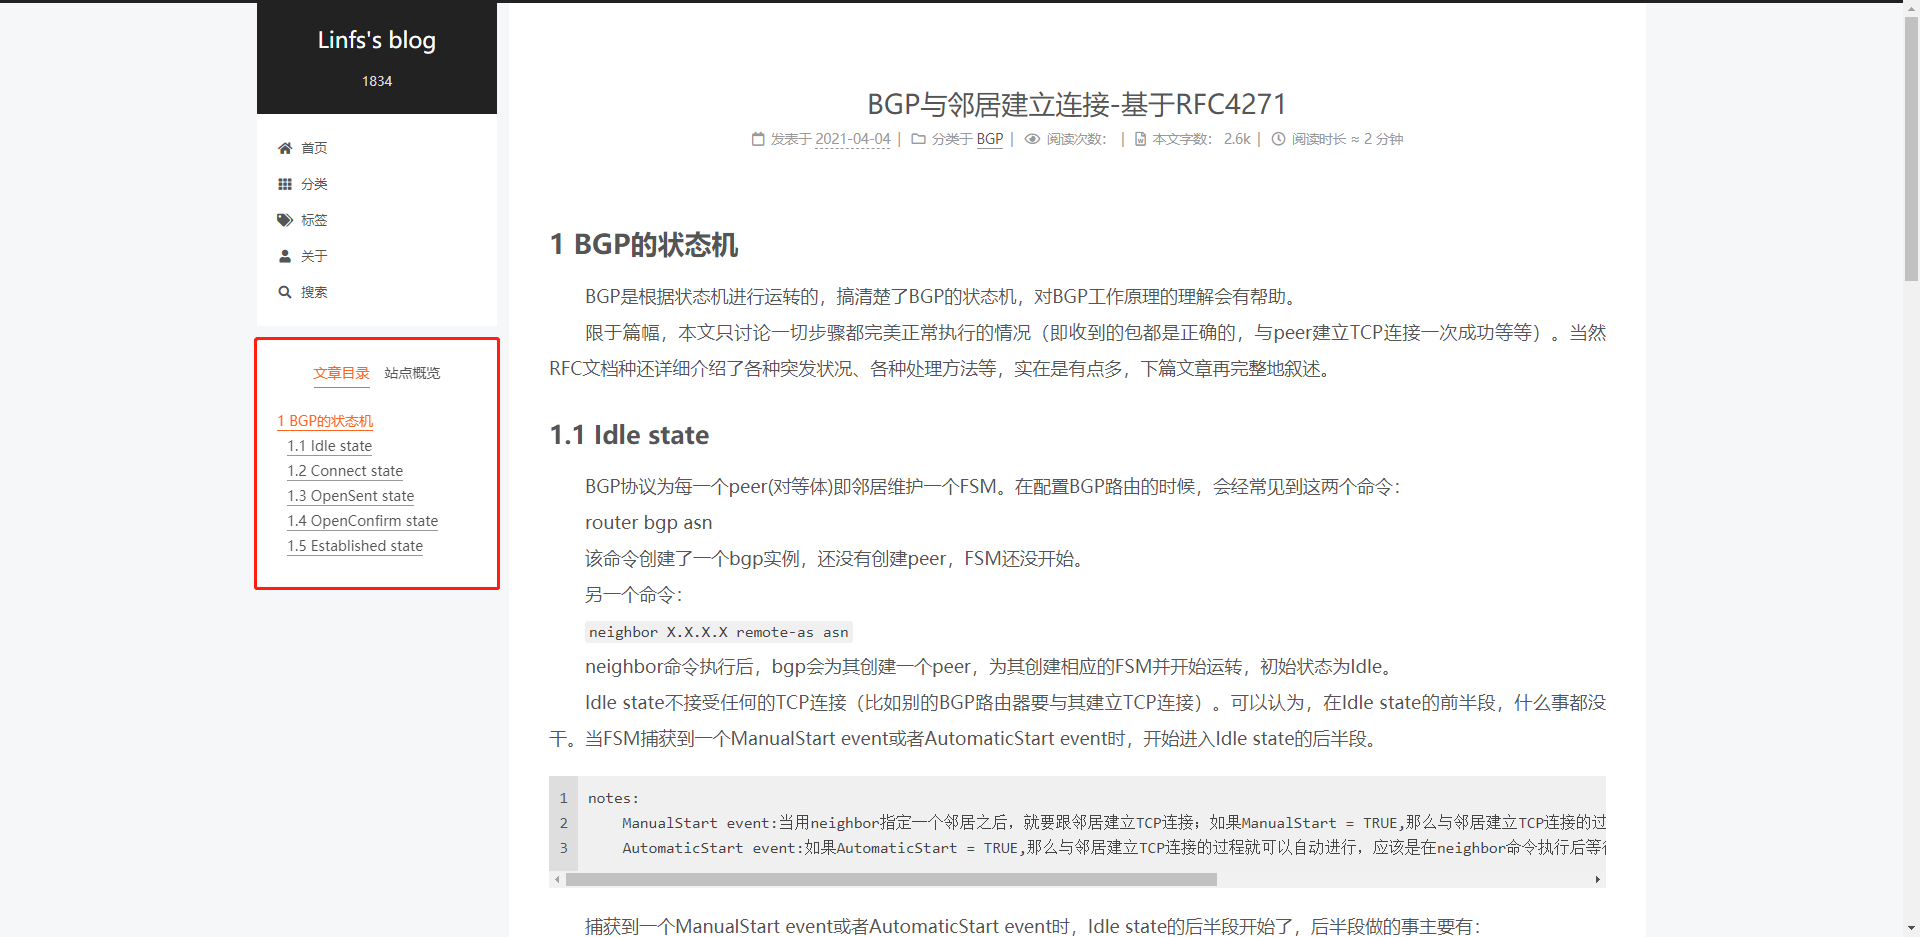
# Table of Contents in the Sidebar
# Front-matter variable (unsupport wrap expand_all).
toc:
enable: true
# Automatically add list number to toc.
number: false

效果如下:

theme-next取消目录自动编号

2.4.5 图片点击放大功能

如果在文章中插入图片,由于某些原因图片可能看不清,此时就需要点击放大预览功能,在theme-next中已经内置了fancybox,在_config.next.yml中把fancybox置为true即可:

1
2
3
# FancyBox is a tool that offers a nice and elegant way to add zooming functionality for images.
# For more information: https://fancyapps.com/fancybox/
fancybox: true

3 本地&github page部署

3.1 本地部署

(1)hexo g可生成静态文件(生成到/public目录下);
(2)hexo clean清理(即删除/public目录);
(3)hexo s可在本地启动,浏览器输入localhost:4000可访问博客。

3.2 github page部署

直接执行hexo d即可部署到github上。

4 写作

支持Markdown